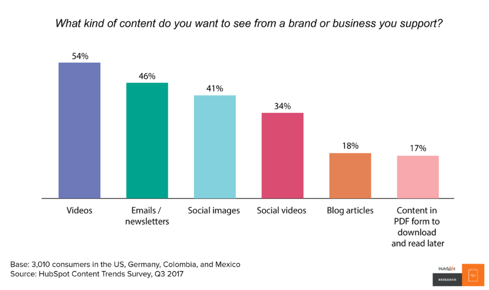
It’s no secret that video marketing has been on the rise and is quickly becoming consumers preferred means to interact with their favorite brands. In fact, according to a recent Hubspot study, more than 50% of consumers want to see videos from brands over other types of content! Beyond that, YouTube has scaled its way to the world’s second largest search engine, making video marketing an impactful strategy for SEO (search engine optimization). Creating an effective video marketing strategy will allow you to build trust with your customers and prospective customers by offering an authentic, one-to-one experience. More like having a conversation with a friend rather than a stiff sales pitch. Through this, building brand awareness and a strong lead generation tool. What’s even better?! Video is within reach for businesses of virtually any size, no matter the size of your team or budget, as long as you have the time to do it. We’ll outline the step-by-step process to creating a video marketing strategy and provide tips and tricks for making your videos a breeze.
What we'll cover:
- Choosing your video type based on your audience
- Writing your script
- Choosing your location
- Filming B-roll
- Using the right equipment
- Editing
- Choosing the right host
Step 1: Choosing your video type based on your audience
Just as with all content you create, keeping your audience front of mind is essential. Which is why in order to understand the purpose and objective of your video, you’ll need to start by understanding your viewer. To help you narrow down the purpose and topic of your video, here are some great questions to ask yourself:
- What is a question you get asked every day?
- Do you have any common points of confusion about your business or what you offer?
- What is a common friction/pain point for your client?
- Is there a process that needs explaining?
Now that you’ve solidified your target audience, let’s narrow down the type of video that is appropriate for your objective. There are quite a few different types of video formats that you can make, here's a list that will help you choose a format that will align with your topic and purpose.
Brand videos
- This will most likely be the type of video that you want to make. This style of the video showcases your brand, which is your business and what you do. This video is perfect for the homepage of your website.
Demo videos
- A demo video will demonstrate how you do something in particular. This might not be relevant to your business, but you might have something that you could show.
Event videos
- If you do a webinar, for example, you might want to record it so other people can watch it. This is what we do with all our webinars. Here's a link to our webinar about video marketing.
Expert videos
- You might interview one of your staff members, or even a self-interview, to provide expert advice on a particular topic.
Educational videos (How-to)
- This one is pretty self-explanatory. Educational videos can be a great starting point for many businesses, as you can provide education around various topics that relate to your niche.
Animated videos
- These can be great but they can be expensive to produce if you outsource it. The videos that we provide as part of our content offerings are animated videos. One of the benefits of doing your own videos is being able to put a face to your company, which doesn't happen with animations. A benefit of animated videos is that it’s timeless and is still relevant even if a staff member leaves your company.
Case study & testimonial videos
- As a financial advisor, you need to be very careful if you do a video like this as it will get red flagged very quickly by your compliance agency. This style of video is great for building trust in your service.
Live videos
- These are great for social media! Keep these short as they’re usually unscripted. An example where this would be great would be if you were to do an event and you could go on your Facebook business page and do a quick live video of the event.
Personalized videos
- This style of video can be very effective and will often just be you talking into the camera. Personalized videos can be used very effectively instead of leaving voicemail messages or included in emails.
Now that you know the topic, purpose, and the format of video that you’re going to make, your next step is to write a script. You should be able to write your script quite quickly as you’ll most likely be doing a video on a topic that you are very comfortable with.
Tip: Keep language short and simple. You will require fewer words than you think, as you can convey emotion and facial expressions to emphasize points, so you don’t need to rely on multiple sentences to hone in a particular message.
Writing conversationally is key to creating the authentic experience consumers are looking for. Quite often how we write and how we speak is different, so write your script as if you were speaking directly to your customer (starting sentences with but and I). To help, we recommend reading the script out loud to make sure that the flow of your writing translates into your speech. This will help make speaking in front of the camera more comfortable and elevate awkward pauses and retakes when filming.
Once your script is finalized, it’s a good idea to send it over to compliance for approval (if needed). This way they have the opportunity to make changes before filming has started, which potentially can save you a ton of work and hopefully prevent you from needing to re-film or re-edit.
Step 3: Choosing your location
Before you start filming, you’ll need to decide on your location (or locations). There are a few things you should consider when making this decision. First and foremost, is whether the location is well lit for video. Wherever you film, try and have as much natural light as possible, it’s important to keep the light in front of your subject and not behind. This is because being backlit by natural light will create a halo or silhouette effect, leaving you unable to see your subjects face. You can see this in the example below. 
You’ll also have to decide if your video should be filmed in a natural setting like your office, or in a studio setting with a backdrop. To make this decision, as always, keep your purpose and audience in mind - ask yourself what are they looking for? Lastly, taking acoustics into consideration is critical, having a good microphone set up is a huge help (we’ll cover this later), however starting out in a space with low ambient/background noise will make editing much easier for you.
In order to make your videos feel more natural (and memorable) to your viewers, you want to create somewhat of a storyboard. This is not mandatory when creating your videos, but as you gain confidence, adding B-roll to your production can make a huge difference. B-roll is supplementary footage, that aids in telling a story or giving an example. B-roll is cut into the main footage of your film, and can be used as an overlay to add extra value to what you are saying. It’s a great way to show people instead of just telling them.
Tip: You can use B-roll as a band-aid for filming mistakes. For example, if you catch yourself reading off a script instead of looking at the camera, or your camera becomes out of focus at times. Cut parts of the film which are obvious and overlay them with B-roll - your audience will never know!
Step 5: Using the right equipment
As we mentioned in the introduction of this article, video is within reach for businesses of virtually any size, no matter the size of your team or budget. It’s really about making the most of the equipment you have on hand and taking the time to learn a few editing tricks to make your videos stand out. Here are a few of the basics you’ll need and a few ‘nice to haves’ in video equipment.
Camera
You first need some form of a camera to film on. If you have a DSLR (Digital Single Lens Reflex) camera with video recording, that is great to use. The reality is these days that most new smartphones are sufficient to film quality videos for website purposes.
Tip: If you’re filming on your phone, remember to put your phone on ‘do not disturb’ mode so you don’t get disturbed by notifications while filming.
Tripod
No matter what you decide to film on, you must use something to keep your camera steady! You can purchase tripods quite cheap on Amazon, and can be a great investment if you’re planning on filming on a regular basis. However, finding a book or another sturdy object to hold your phone in place works great as well.
Tip: If you’re filming on your smartphone, film with your phone positioned horizontally. This way if viewers are watching your videos on their own phones, the video will auto-adjust portrait orientation on their screen no matter what way they are holding their phone (horizontally or vertically).
Microphone
The quality of your audio will be OK without a microphone, but just like a tripod, small lavalier microphones from Amazon quite cheap and it will be worth every cent to have better quality audio. This can help making your editing much easier, as having a lavalier microphone helps cut out any background noise and creates a crisper sound.
Lighting
Natural light is an awesome, free option for filming your videos! However, if you’re not able to find a space that’s well lit, or not able to gain access to this space during the ideal hours, buying a lighting solution can significantly improve the visual quality of your videos. You guest it, Amazon has tons of lighting options at fairly low price points. 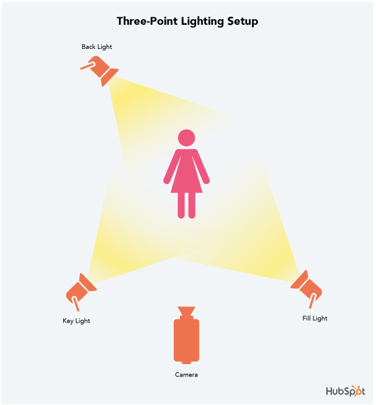
The image above is a great example of the ideal lighting setup. If you draw a square around the subject of the video, you should have two lights at the front two corners, and the third on one of the back corners. If you only have one light, then place it right behind the camera so you have a good front lighting (creating the least amount of shadows).
Tip: Something to keep in mind, if the person you’re filming wears glasses, using two or more lights is best as straight on light will pick up as a reflection in your film.
Step 6: Editing
Now that you’ve completed filming, there’s some editing software you’ll need for post production. If you’re a Mac owner, iMovie is a free option you most likely already have available to you. Another free program which we recommend for both PC and Mac owners is DaVinci Resolve 15. They offer both a free version of their software and a premium version. The free version is a great option to get your feet wet in editing. Once you’ve picked up the basic skills of cutting, overlays, titles and exporting, the skills are pretty transferable among most software programs. Once you’ve progressed your skills and you’re ready to make an investment in more advanced editing software, Adobe Premiere Pro CC and Final Cut Pro are great options to look into.
If you’re a beginner to editing, don’t worry it’s a skill that is easy enough to learn. With it’s increase in popularity, there are an abundant amount of tutorials and learning resources online - many of which are completely free! YouTube will be your best friend when starting out, most questions you have about which tools to use or how to import and export film can all be answered with a quick YouTube search that includes the name of your editing program. You’ll find tailored training videos that you’ll be able to follow along and in no time you'll be a pro!
Some quick tutorials to search before getting started:
- Basic video editing tools; cutting tool (razer), pen (mark tool), delete (ripple delete), select (hand tool)
- How to import video and soundtracks
- How to create overlays and title slides
- How to adjust the speed of your film
- How to render and export your finished film
Tip: If you decide to upgrade your software, it’s a good idea to keep in mind the quality and memory space your computer before deciding what program to invest in. Video editing requires a lot of computer power; be sure you’re not investing in software that your computer isn’t able to handle.
Step 7: Choosing the right host
You’re now at the final step! You’ve created a video you’re proud of and ready to share it with the world, but what is the best platform to host your videos?
If you’re a client of ours we can host it for you, but you’re also welcome to host the video yourself on YouTube, Vimeo, Vidyard or Wistia, then you just have to use the embed coding link that it gives you to be able to post it on your website. Each of these hosting platforms all have advantages and disadvantages. For example, Youtube is great for SEO purposes and it’s free, however, once the video finishes, YouTube prompts users onto its next ‘suggested video’ which you cannot always control.
Everyone digests and absorbs information differently. Some people would prefer to watch a 3 minute video instead of reading a 1000 word article, yet others prefer to read. Because of this, re-purposing your video into a blog post, or vice versa is a great way to leverage your work and create greater ROI (return on investment). You can include the video at the top of the blog post for those who would prefer to watch it, but the text is below for those who want to read it.
Happy filming!
We hope you've found our step-by-step guide for creating an effective video marketing strategy helpful and that some of the tips and tricks we've learnt along the way can smooth your learning process. Once you've mastered these steps, you're on your way to becoming a pro at creating an engaging and authentic experience for your customers and prospects. Happy filming!
Additional resources:
- WEBINAR: A Step-by-step Guide to Video Marketing
- EBOOK: 6 Content Marketing Mistakes that Financial Professionals Make


.png)